

Necessity is the mother of invention
It’s bedtime. Brushing my teeth, washing my face, and finally going to bed. There’s one thing I’ve forgotten again. While I’m floating on cloud nine, I look at my lamp. My nemesis… My brain tries to find a solution with the last energy to turn off the lamp without getting up. If only I could use the force, like in Star Wars, to turn off the lamp. My ideas slowly lose reality. Then, just before I had almost given up hope, I come up with the most useful idea of all. We live in an age of digitalization. For example, there are autonomous driving cars, vacuum cleaning robots, intelligent light sensors, and so on. All of the devices mentioned can already be controlled via cell phones these days. My lamp is even one of the intelligent ones. So why don’t I get myself together and build a mobile app to control my smart lamp with my cell phone?
What do I need?
I get up from my bed and move to my desk full of energy. Now to work. What do I need?
The setup consists of:
- Smart light source e.g.: Müller Licht – tint White & Color or IKEA Trådfri
- RasperryPi
- RaspBee II
For more information, check out Björn Latte’s blog “connecting titan to the IoT world” under the section “Getting smarter”.
No-Code for the mobile app
Developing a mobile app is usually a challenge. I would have to invest several hours of work to understand the basic framework of an app for iOS or Android. But I don’t have the time for that this late in the evening. titan makes it possible to use No-Code to simplify backend integration for enterprises. Perhaps there are such tools for app development as well? After researching online, I decided to go with FIGMA and Bravo Studio.
Figma is an online prototyping design tool. With it, it is possible to create the design of my app.
Bravo Studio is used to create a native mobile app from a FIGMA project and connect the logic to the design.
With both tools together the frontend, the app itself, is developed. I realize the backend with the titan platform. The hardware, both tools, and titan are all I need. It’s time to have fun now..
Realization of the lamp control
Structure of my system:
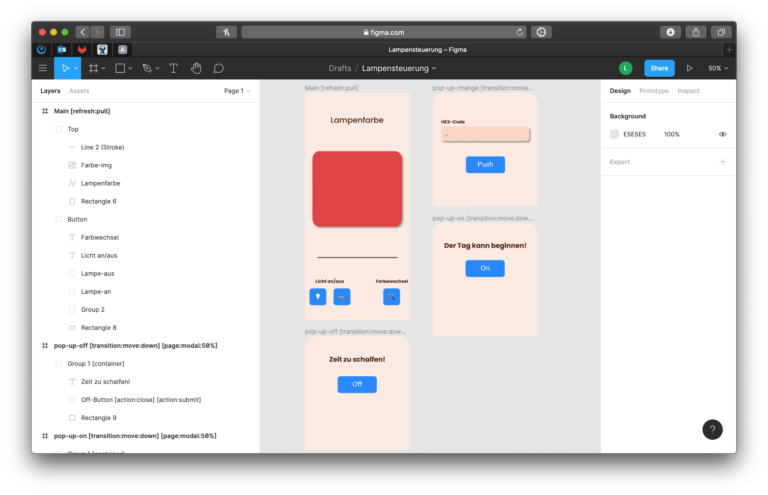
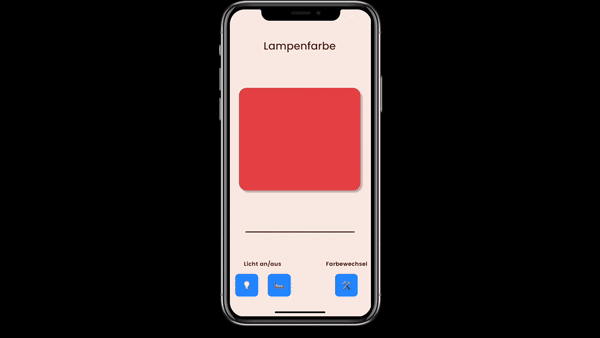
The very first thing I do is start designing my app with FIGMA. The elements are dragged and dropped into the drawing area, just like in titan. I start by building the first frame. This is to become my home screen when I open the app. The color of the lamp and three buttons are displayed there. One button always opens a pop-up window to control it. Two buttons are for turning the lamp on or off. Another button allows me to change the color.
So, the design is ready. Before I continue with the app, I’ll start building the backend. Therefore off to titan.
The subject of the back end makes the hair on my arm curl. Long hard work and lots of planning are required before I write the first line of code. Fortunately, with titan, I don’t have to write any code to get the same functionality. Let’s start!
Open the titan website, log in, and off you go. Quickly create a new flow and enter the flow editor. All necessary Bricks are available.
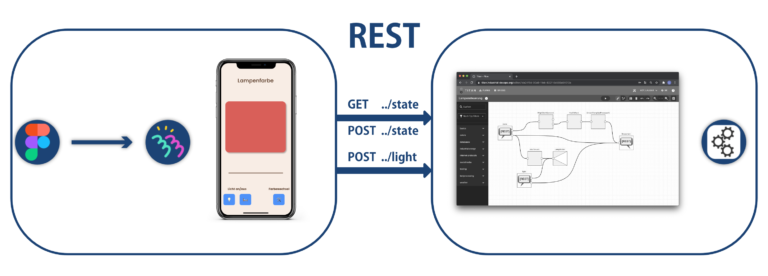
I need three functions for my control:
| Typ | URL | Daten | Bedeutung |
|---|---|---|---|
GET | ../state | none | status of the lamp |
POST | ../state | {"color": } | change color |
POST | ../light | {"on": <On/Off as Boolean>} | light on/off |
The following flow results from the three interfaces:
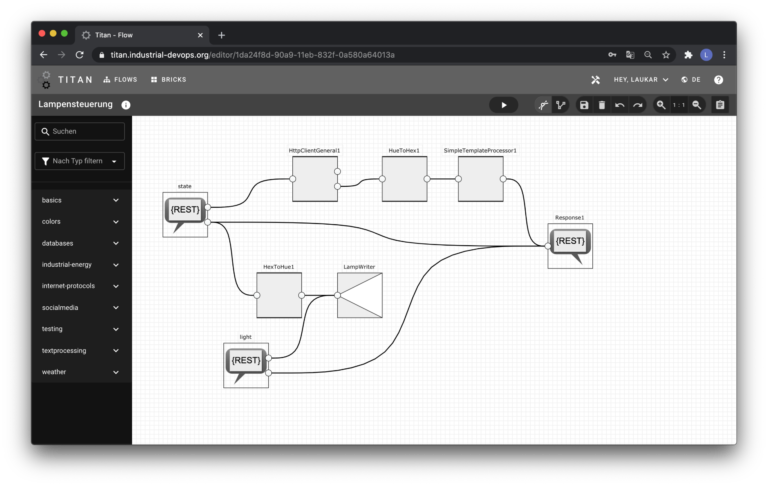
The state and light bricks are Request bricks. They are accessible under a specific URL and offer the upper services to the app. The structure is as follows:
https://{Titan-Service-URL}/endpoint/{Username}/{Flowname}/{Request-Brickname}
The flow can be split into two main URLs.
Determine and change the status of the lamp: ../state
The ../state-URL allows a GET or POST request. Depending on the request, an output port is chosen. A GETrequest will trigger theHttpClientGeneral1brick. A GET request from the HttpClientGeneral1 is made to the lamp to get the current color. Then the following data is sent to the HueToHexbrick.
{
  "hue": 2000,
  "sat": 120,
  "bri": 120
}
The RGB color value is then calculated from the data. The color value is needed to create an image for our app that contains exactly this color. For this, there is an open API that will generate an image for us. The ${color} value is replaced with the calculated color value.
https://singlecolorimage.com/get/${color}/320x270
The Response1brick then responds to my app with the URL above. Now, what happens when I make a POST request? I need to access the app’s sent data. For this, I use port mapping.
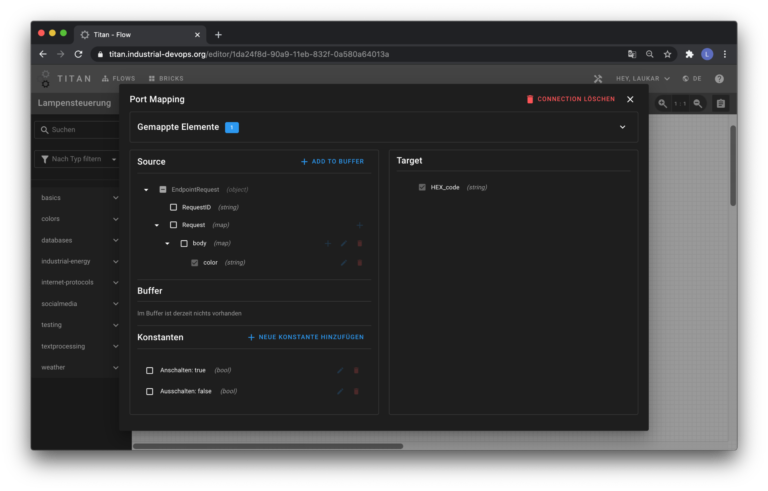
The data from the cell phone is forwarded to the HexToHue brick via the state brick. This calculates the HSL color value for the lamp. Then the LampWritercan send the value to the lamp to change the color. The Response2brick responds to the app that the request has arrived and was successful.
Switching the lamp on and off: ../light
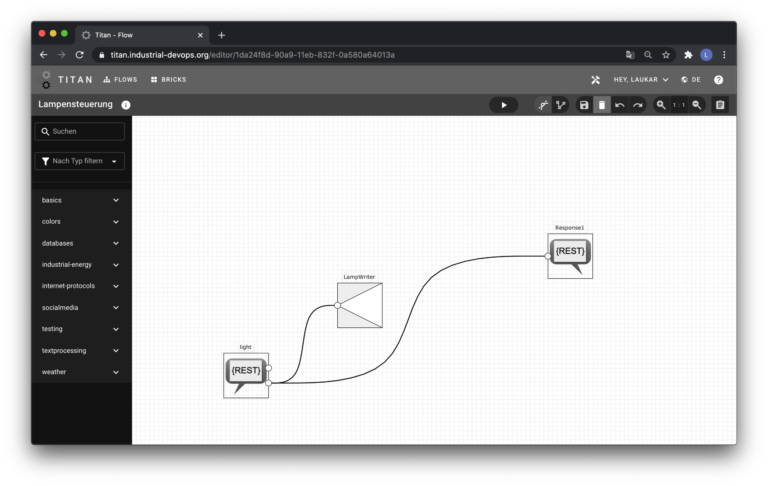
Now I am setting up the on and off switch. Otherwise, I still have to sleep in the light tonight. The other interface is ../light. I use this only to switch the light on and off. So I can connect it directly to the LampWriter. Just like the above, I need to adjust the port mapping accordingly.
My flow is up and running. Now off to Bravo Studio. My brain is getting tired, but just a little more, and the control is ready.
First of all, I have to import my FIGMA project into Bravo Studio. Fortunately, this works quite easily via log-in with my FIGMA user data. Now I have to create a Data Library. A Data Library describes a collection of REST requests. I create four REST requests for my existing flow.
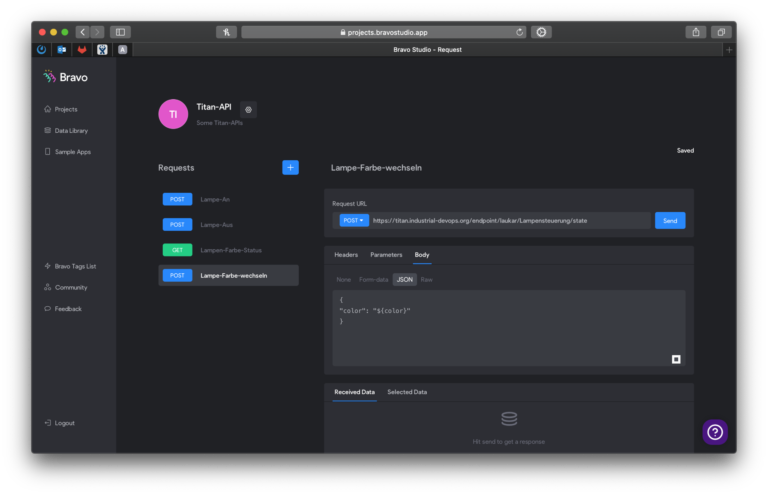
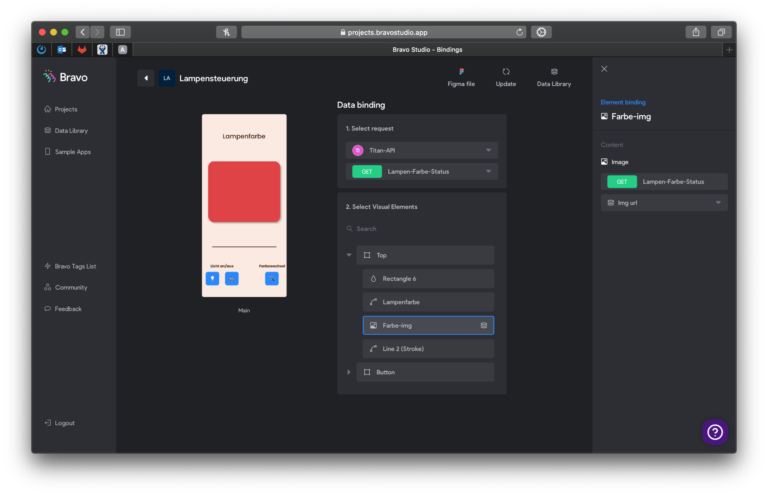
The figure shows the REST request to change the lamp color. Variables can be defined via${}, which are then filled with data from the app. Now for the data binding. You start by choosing the app page. You can (currently) only connect one REST request per page.
To connect the data, you first select the request as the source and then the visual element as the sink of the data. Bravo Studio then automatically handles the connection of the elements and the data.
Done, just install it
Finally, everything is done. The last step is missing. The app now has to go on my phone. For this, I just use my own Bravo Studio app. With it, I can access all the created projects of my Bravo Studio account.
Oh, already 1:00 in the morning. I go back to bed and fall asleep quickly. I stare at the ceiling with a broad smile. This time the lamp doesn’t win against me. I hold up my smartphone, open the app, and turn off the lamp. The lamp is off and I have the most restful sleep in a long time.